7 OPEN SOURCE TOOLS FOR JAVA DEPLOYMENT

June 30, 2014

1. Jenkins :  https://wiki.jenkins-ci.org/display/JENKINS/Meet+Jenkins

2. Chef: http://www.getchef.com/chef/

3. Vagrant: http://www.vagrantup.com/

4. Packer: http://www.packer.io/

5. Docker: http://www.docker.com/

6. Flyway: http://flywaydb.org/

7. Rundeck: http://rundeck.org/


Installing Oracle 11g in Redhat linux: Few Tips

September 27, 2012
  1. Create oracle user, create a user group oinstall, assign oracle to oinstall.
  2. Configure necessary folder and variable instruction given in oracle setup in linux guideline document.
  3. Copy oracle software in your linux pc.
  4. Enable vnc server as follows if  vnc is not enable. To enable vnc, click here.
  5.  Setup oracle from user other than root. Give permission to other user to setup oracle using #xhost +.
  6. Swich user from root to other user and using #su.
  7. Open terminal. Goto directory where you copy oracle software and run oracle using # sh runInstaller.
  8. After completing setup set environment variable in profile file. goto  # cd /etc; #vi profile

CATALINA_HOME=”/usr/local/apache-tomcat”; export CATALINA_HOME

CATALINA_BASE=”/usr/local/apache-tomcat”; export CATALINA_BASE

ORACLE_HOME=”/u01/app/oracle/product/11.2.0/dbhome_1″;  export ORACLE_HOME

ORACLE_SID=”orcl”; export ORACLE_SID

ORACLE_BASE=”/u01/app/oracle”; export ORACLE_BASE

      9. Restart pc #shutdown –Fr now.

      10. Connect to database using sqlplus and create db user. Goto directory # cd u01/app/oracle/product/11.2.0/dbhome_1/bin/;

                     # ./sqlplus / sys as sysdba

      11. Change database file, index etc if necessary.


(adsbygoogle = window.adsbygoogle || []).push({});


Enable VNC service in a Redhat Linux Machine

September 27, 2012

If we want to get the graphical user interface of a linux PC from remote machine, then we have to enable the VNC service on that linux machine. We can enable the vnc by following ways in Redhat linux machine:

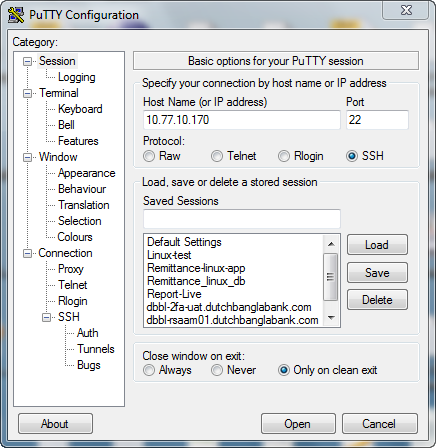
  1. Login to a particular linux machine with a remote login utility like putty.

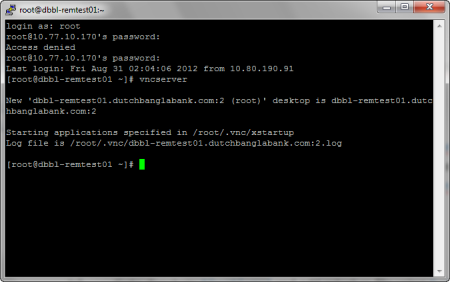
  1. Check the vnc service whether it is enabled or not with this command: vncserver.

  1. If the vnc service is disabled then go to the sysconfig directory. #cd /etc/sysconfig and open the file vncservers with the command, vi vncservers.

Uncomment and edit the following lines as follows:

VNCSERVERS=”1:root”

VNCSERVERARGS[1]=”-geometry 800×600″


1. Set vnc password using #vncpasswd.

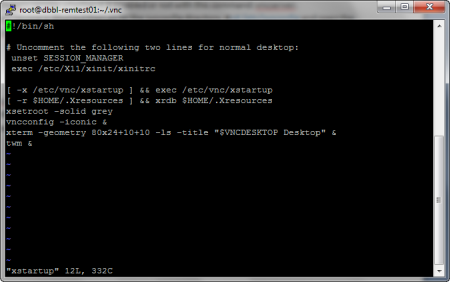
1. Go to directory #/root/.vnc/ and edit xstartup file using # vi xstartup as like just uncomment first two line.

unset SESSION_MANAGER

exec /etc/X11/xinit/xinitrc


1. Stop ,run and restart vnc service using #service vncserver stop/start/restart


BI Publisher Macro Error

June 24, 2012

I have worked on BI publisher few months ago. But today when I started to work again on BI publisher, it was not working. In add-ins tab of MS word 2007, when I checked any menu, it was showing error like The macro cannot be found or has been disabled because of your macro security setting. After googling, I have solved the problem following ways. I have searched *.exd file in my pc and renamed the exd files as back file. Then I have restarted the MS word 2007 and found everything is ok.

For more details, http://damir-vadas.blogspot.com/2011/02/macro-cannot-be-found-or-has-been.html

http://kumarsatheesh.blogspot.com/2012/04/macro-cannot-be-found-or-has-been.html

http://boddapati-peoplesoft.blogspot.com/2012/05/error-with-bi-publisher-macro-cannot-be.html


Performance Tuning in Apache Tomcat 6

May 26, 2012

Performance tuning is a complex area, and the factors that affect performance are sometimes out-side the application itself. These factors may include the network configuration and hardware  platform characteristics, the operating system settings, Java virtual machine parameters, database tuning parameters, and finally the architecture of the Web application itself.

Recommended approach of performance tuning:

1.     Set up a test bed.

2.    Do performance testing. Use the results of your first test run as a performance benchmark or baseline for subsequent testing.

3.    Investigate performance bottlenecks in your application, deployment environment, and other systems that it interacts with.

4.    Identify areas where improvements are needed; these might involve implementation changes as well as deployment or configuration tuning of your Web application.

5.    Make one fix.

6.    Repeat steps 2 through 5.

Step 1: Set Up a Test Bed

Create a mirror of production with application and database. All performance related test will be occurred in this test bed.

Step 2: Test Performance and Identify the Baseline

Before you start performance tuning in earnest, measure how the system is performing currently. Developing a good plan for performance testing is important. Some considerations while developing test

plans are as follows:

  • Use automated performance test tools.
  • The test traffic generated should mirror the expected traffic on the Web site as much as possible.
  • Send test traffic to cover as many paths through your application as feasible, and send HTTP requests with different request parameters.
  • Test with the extremes.
  • Test over longer periods.

 Step 3: Diagnose Performance Bottlenecks

Next, identify your performance bottlenecks. Performance issues can be diagnosed in a number of ways:

❏     Instrument your application with log messages, or profile it to determine where it spends most

of its time.

❏    Use any performance tuning tools supplied by your database vendor to identify performance

problems.

❏    Use the tools provided by your operating system to look at the CPU, memory, and I/O usage

characteristics of your application. These can often give you a clue about what the root cause of

the performance issue is.

Some of the useful Linux tools that you can use to examine the system resource usage include:

❏    top:  Displays the top CPU-intensive processes.

❏    vmstat:  Reports on virtual memory, as well as statistics on processes, and disk and CPU activity.

❏    free:  A snapshot of the free and used memory on your system.

❏    sysstat:  A family of tools available from   http://perso.orange.fr/sebastien.godard/

index.html. These include the   iostat  tool that reports on CPU and I/O statistics.

Diagnosing Tomcat Performance Issues

Diagnosing issues with Tomcat can be very tricky. It gets easier when there is an indication about what is

causing the problem in the Tomcat logs, such as:

  • Tomcat freezes or pauses with no requests being processed:  Tomcat could be doing a lot of garbage collection. Set the   -verbose:gc  flag for the JVM and observe from the log file if this is indeed the case. If so, tune the JVM parameters, such as   -Xms  and   -Xmx.
  • OutOfMemory exceptions in the Tomcat logs:  This can occur for a number of reasons: A memory leak in your application:  Run a profiler to see if this is the case. The maximum heap memory is less:  Use the   -Xmx  option to increase it.
  •  Too much memory has been allocated:  For example, you should not set your maximum heap size to be the same or very close to your system RAM. Your OS uses a certain per-cent of the RAM, and if the   -Xmx   value is set too high, Java can take this memory fromyour swap disk. This will slow down Tomcat significantly, and you might also see an OutOfMemory  exception if you run out of swap.
  • Tomcat caches the JSP content generated:  If your generated JSP pages are very huge, the result may be   OutOfMemory  exceptions as the cached response fills up the heap. Set the   org.apache.jasper.runtime.JspFactoryImpl. USE_POOL  and   org.apache.jasper.runtime.BodyContentImpl.LIMIT_BUFFER  to   false  to fix this.
  • The JDK has built-in mechanisms to help debug pesky out-of-memory errors:  For instance, Sun’s JDK has an option called   -XX:-HeapDumpOnOutOfMemoryError  that, asthe name suggests, writes out the heap memory dump when there is an   OutOfMemory  exception. This  .hprof  file can then be read by profiling tools to help debug the problem.
  • The OutOfMemoryError:  PermGen space errors sometimes occur if you run multiple Web applications in single Tomcat instance, or if your application loads up a lot of classes. The JVM allocates a 64MB memory chunk for the permanent generation heap, which is the heap that holds objects such as classes and methods. When this space gets exceeded, you start getting the PermGen space errors. You would need to increase this setting: Use the   -XX:MaxPermSize  option in Sun’s JDK to increase the permanent generation heap space. This is explained in more detail in the section “Tuning the JVM Parameters” later in the chapter.

Tomcat Performance Tuning Tips

Broadly, factors that affect performance can be addressed at three stages: at design time, at development time, and at deployment time.  Decisions made at design time often have the greatest impact on performance. The design includes both the software as well as the system architecture. The software architecture is concerned with issues such as design of software modules, data structures, and so on. The system architecture, on the other hand, would also address issues such as the following:

❏    How will your software components be deployed?

❏    Is there load balancing to handle a large volume of requests?

❏    Are there clustering/failover capabilities to handle situations when a Web server or any other component of the Web site goes down?

The development time issues relate to how the Java code for the Web application was designed and implemented. Again, there is a whole set of implementation best practices surrounding this area, such as:

❏     Do not create sessions for JSPs if they are not required.

❏    Do not store large objects in your session.

❏    Time out sessions quickly, and invalidate your sessions when you are done with them.

❏    Use the right scope for objects.

❏    Use connection pooling for improving performance.

❏    Cache static data.

❏    Use transfer objects to minimize calls to remote services.

❏    Minimize logging from Web applications, or use simple logging formats.

 Tuning the  JVM  Parameters

There are two different virtual machines inside the binary that’s executed to start Java applications: the client VM and the server VM. Each of these two VMs is optimized according to the needs of client and server applications.  The server VM can be selected by passing the   -server  command-line option to the Java VM on startup. This can be done by setting the   JAVA_OPTS  variable in the Tomcat startup script.

The minimum and maximum heap size can be increased through Xms and Xmx parameter.

These, and other options, can be passed to the JVM running Tomcat by modifying the   <TOMCAT_HOME>/catalina.sh  (or   catalina.bat ) file, and adding the following line (as an example) in the beginning of the file.

On Linux:

JAVA_OPTS=”$JAVA_OPTS -Xms512m -Xmx1024m”

On Windows:

SET JAVA_OPTS=%JAVA_OPTS% -Xms512m -Xmx1024m

An important option for Sun’s JVM is the   -XX:MaxPermSize  option. This is used to specify the size permanent generation heap, which is the heap that holds objects such as classes and methods.

Turning Off  JSP  Reload and  JSP  Development Mode

The two attributes that control the JSP compilation behavior in Tomcat are   development  and reloading . If you don’t want the JSP pages to be checked for modification each time there is a request, you should set   development  to   false .  In the following settings, the   reloading  attribute is also set to   false . Had   reloading  been   true ,  background compiles would have been enabled. The background compile option causes the container to check and compile JSPs after a period of time. Another configurable parameter, called   checkInterval decides how frequently the compiles are triggered.  In the current Tomcat default setting, both   development  and   reloading  are set to   true , and   checkInterval  is set to   300  seconds.

Open the (<Tomcat Home>/conf/web.xml) file and edit the initial parameters like this:

<servlet>

<servlet-name>jsp</servlet-name>

<servlet-class>org.apache.jasper.servlet.JspServlet</servlet-class>

<init-param>

<param-name>fork</param-name>

<param-value>false</param-value>

</init-param>

<init-param>

<param-name>development</param-name>

<param-value>false</param-value>

</init-param>

<init-param>

<param-name>reloading</param-name>

<param-value>false</param-value>

</init-param>

</servlet>

 Turning On Custom Tags Pooling

The following is an excerpt from the global Web application deployment descriptor (  <Tomcat

Installation Directory>/conf/web.xml ) that has defaults for all the Web applications. The settings are for the   JspServlet , which handles all requests for JSP pages. The   enablePooling  attribute specifies whether pooling of tag library classes is to be enabled (  true ) or not (  false ). If this setting is missing, it defaults to   true .

<servlet>

<servlet-name>jsp</servlet-name>

<servlet-class>org.apache.jasper.servlet.JspServlet</servlet-class>

<init-param>

<param-name>fork</param-name>

<param-value>false</param-value>

</init-param>

<init-param>

<param-name>enablePooling</param-name>

<param-value>true</param-value>

</init-param>

</servlet>

 Turning Off Web Application Auto-Deploy and Reloading

By default, Tomcat monitors the   <TOMCAT_HOME>/webapps  directory for new Web applications, and as soon as a WAR file is copied there, it gets automatically deployed. While this auto-deploy feature is great for development environments, it has a performance impact and should be disabled in production.  To turn off auto-deploy in Web applications, edit the   server.xml  file and set the   autoDeploy  attribute in the appropriate   Host  to   false , as shown here:

<Host name=”localhost” appBase=”webapps” unpackWARs=”true”

autoDeploy=”false”

xmlValidation=”false” xmlNamespaceAware=”false”>


SSL Configuration in Apache Tomcat 6

May 26, 2012

 Introduction to SSL

SSL, or Secure Socket Layer, is a technology which allows web browsers and web servers to communicate over a secured connection. This means that the data being sent is encrypted by one side, transmitted, then decrypted by the other side before processing. This is a two-way process, meaning that both the server AND the browser encrypt all traffic before sending out data.

Another important aspect of the SSL protocol is Authentication. This means that during your initial attempt to communicate with a web server over a secure connection, that server will present your web browser with a set of credentials, in the form of a “Certificate”, as proof the site is who and what it claims to be. In certain cases, the server may also request a Certificate from your web browser, asking for proof that you are who you claim to be. This is known as “Client Authentication,” although in practice this is used more for business-to-business (B2B) transactions than with individual users. Most SSL-enabled web servers do not request Client Authentication.

SSL and Tomcat

It is important to note that configuring Tomcat to take advantage of secure sockets is usually only necessary when running it as a stand-alone web server. When running Tomcat primarily as a Servlet/JSP container behind another web server, such as Apache or Microsoft IIS, it is usually necessary to configure the primary web server to handle the SSL connections from users. Typically, this server will negotiate all SSL-related functionality, then pass on any requests destined for the Tomcat container only after decrypting those requests. Likewise, Tomcat will return clear text responses that will be encrypted before being returned to the user’s browser. In this environment, Tomcat knows that communications between the primary web server and the client are taking place over a secure connection (because your application needs to be able to ask about this), but it does not participate in the encryption or decryption itself.

Certificates

In order to implement SSL, a web server must have an associated Certificate for each external interface (IP address) that accepts secure connections. The theory behind this design is that a server should provide some kind of reasonable assurance that its owner is who you think it is, particularly before receiving any sensitive information. While a broader explanation of Certificates is beyond the scope of this document, think of a Certificate as a “digital driver’s license” for an Internet address. It states what company the site is associated with, along with some basic contact information about the site owner or administrator.

This “driver’s license” is cryptographically signed by its owner, and is therefore extremely difficult for anyone else to forge. For sites involved in e-commerce, or any other business transaction in which authentication of identity is important, a Certificate is typically purchased from a well-known Certificate Authority (CA) such as VeriSign or Thawte. Such certificates can be electronically verified — in effect, the Certificate Authority will vouch for the authenticity of the certificates that it grants, so you can believe that that Certificate is valid if you trust the Certificate Authority that granted it.

Overall Steps

  1. Enable SSL in Apache Tomcat 6.
  2. Create the CSR & Key store and send it to certificate authority.
  3. Get the certificate.
  4. Download intermediate keys and load all certificates in Keystore.
  5. Configure Tomcat.

Enable SSL in Apache Tomcat 6

Open the $CATALINA_HOME/conf/server.xml and uncomment SSL connector code which looks like:

<– Define a SSL Coyote HTTP/1.1 Connector on port 8443 –>

<!–

<Connector

port=”8443″ maxThreads=”200″

scheme=”https” secure=”true” SSLEnabled=”true”

keystoreFile=”${user.home}/.keystore” keystorePass=”changeit”

clientAuth=”false” sslProtocol=”TLS”/>

–>

The port attribute (default value is 8443) is the TCP/IP port number on which Tomcat will listen for secure connections. You can change this to any port number you wish (such as to the default port for https communications, which is 443).

After completing these configuration changes, you must restart Tomcat as you normally do, and you should be in business. You should be able to access any web application supported by Tomcat via SSL. For example, try:

https://localhost:8443

and you should see the usual Tomcat splash page (unless you have modified the ROOT web application)

Create a local Certificate Signing Request (CSR)

In order to obtain a Certificate from the Certificate Authority of your choice you have to create a so called Certificate Signing Request (CSR). That CSR will be used by the Certificate Authority to create a Certificate that will identify your website as “secure”. To create a CSR follow these steps:

  • Using the java keytool command line utility, the first thing you need to do is create a keystore and generate the key pair. Do this with the following command:

$JAVA_HOME/bin/keytool -genkey -keysize 2048 -keyalg RSA -alias tomcat -keystore /usr/SSL/remit_keystore.keystore

Tip: The 2048 in the command above is the key bit length. GeoTrust recommends a key bit length of 2048. In some cases you will have to enter the domain of your website (i.e. www.myside.org) in the field “first- and lastname” in order to create a working Certificate.

  • The CSR is then created with: $JAVA_HOME/bin/keytool -certreq -alias tomcat -file /usr/SSL/remit_csr.csr -keystore /usr/SSL/remit_keystore.keystore.

You will get remit_csr.csr certificate in /usr/SSL directory. You have to sent this certificate to certificate authority.  For more details you may click here: http://www.geocerts.com/csr/tomcat

Importing the Certificate

Now that you have your Certificate you can import it into you local keystore. First of all you have to import a so called Chain Certificate or Root Certificate into your keystore. After that you can proceed with importing your Certificate.

  1. Store the certificate in a cert.cer file.
  2. Download primary & secondary intermediate certificate  from verisign site.

To download go https://knowledge.verisign.com/support/ssl-certificates-support/index?page=content&id=AR212 and click on ‘Tomcat Secure Site Pro w/EV’.

Download intermediate certificate from here https://knowledge.verisign.com/support/ssl-certificates-support/index?page=content&id=AR1728 and save as primary_inter,cer and secondary_inter.cer.

  1. Go to $JAVA_HOME/bin and run following commands to import certificates

keytool -import -trustcacerts -alias primaryIntermediate -keystore /usr/SSL/remit_keystore.keystore -file /usr/SSL/primary_inter.cer

keytool -import -trustcacerts -alias secondaryIntermediate -keystore /usr/SSL/remit_keystore.keystore -file /usr/SSL/secondary_inter.cer

keytool -import -trustcacerts -alias tomcat  -keystore /usr/SSL/remit_keystore.keystore -file /usr/SSL/cert.cer

Before running these commands please make sure that all certificates are in /use/SSL directory. Or, change the paths in commands.

Configuration in Tomcat

Open the server.xml and provide actual location of keystore and its password in SSL connector.

Restart the server and enjoy SSL in tomcat.

For More details, click on follwoing links:

1. http://tomcat.apache.org/tomcat-6.0-doc/ssl-howto.html

2. http://www.geocerts.com/csr/tomcat

3. https://knowledge.verisign.com/support/ssl-certificates-support/index?page=content&id=AR1130

4. https://knowledge.verisign.com/support/ssl-certificates-support/index?page=content&id=AR212

5. https://knowledge.verisign.com/support/ssl-certificates-support/index?page=content&actp=CROSSLINK&id=SO9313


Scheduling database backup in linux

April 24, 2012

We can create a corn job to run a shell script periodically. But creating a job schedule for taking database backup is subtle difference. In the script you have to write code to navigate to database bin directory and then the script for exporting.

Steps:

1. Edit the crontab using following command and add the line as below:
$crontab -e

0 19 * * * /usr/db_backup/export.sh
Scheduling backup at 7pm every day.

here,

* * * * * command to be executed
– – – – –
| | | | |
| | | | +—– day of week (0 – 6) (sunday = 0)
| | | +——- month (1 – 12)
| | +——— day of month (1 – 31)
| +———– hour (0 – 23)
+————- min (0 – 59)

Contents of export.sh:

export ORACLE_BASE=/orafs/app/oracle
export ORACLE_HOME=$ORACLE_BASE/product/11.2.0/dbhome_2
export PATH=$ORACLE_HOME/bin:$PATH
export ORACLE_SID=remittance
exp userid=dbbl/ggg@remittance file=/usr/db_backup/remdb_$(date +%Y_%m_%d_%s).dmp log=/usr/db_backup/remdb_$(date +%Y_%m_%d_%s).log owner=dbbl buffer=200000

cron commands:

$crontab -l To list the cron jobs scheduled
$crontab -r To remove the cron job
$crontab -e To edit/schedule cron jobs

Crontab Environment:

cron invokes the command from the user’s HOME directory with the shell, /usr/bin/sh).
cron supplies a default environment for every shell, defining:
HOME=user’s-home-directory
LOGNAME=user’s-login-id
PATH=/usr/bin:/usr/sbin:.
SHELL=/usr/bin/sh

Special words:

If you use the first (minute) field, you can also put in a keyword instead of a number:

@reboot     Run once, at startup
@yearly     Run once  a year     "0 0 1 1 *"
@annually   (same as  @yearly)
@monthly    Run once  a month    "0 0 1 * *"
@weekly     Run once  a week     "0 0 * * 0"
@daily      Run once  a day      "0 0 * * *"
@midnight   (same as  @daily)
@hourly     Run once  an hour    "0 * * * *

Leave the rest of the fields empty so this would be valid:

@daily /bin/execute/this/script.sh

Storing the crontab output

By default cron saves the output of /bin/execute/this/script.sh in the user’s mailbox (root in this case). But it’s prettier if the output is saved in a separate logfile. Here’s how:

*/10 * * * * /bin/execute/this/script.sh 2>&1 >> /var/log/script_output.log
For More details:
http://pdpshetty.blogspot.com/2008/06/scheduling-backup-using-crontab-in.html
http://kevin.vanzonneveld.net/techblog/article/schedule_tasks_on_linux_using_crontab/?bcsi-ac-79063B1DC99A4FDC=1E822DFD00000002n6jp8FjbjUCkQ0hUgfyEPqjAMN68CwAAAgAAAMw9LQCEAwAAFQAAANYWAAA=

Database Driven Menu in JAVA

February 11, 2012

Menu management is an important part of today’s software development. If we develop an enterprise software with 100s pages, it would be stupidity to write code for menu at every page. We have to have a common menu configuration file, where we can change menu elements. But, there are also some problem, file may be deleted by any developer. After deployment the project, we cannot change menu items at run time. Moreover its very difficult to give roles to menu items at file. Its mandatory to create database driven menu for a dynamic, role based enterprise project.

Here we are going to discuss about building a database driven menu step by step.

1. Create a user table with login name, password and other static information of a user.

2.  Create a ROLE_MASTER table with all role_id, role_description and maker_id.

3.  Create a ROLE_DETAILS table, which contains mapping of role_id and page link. Columns this table will be ROLE_ID & ROLE_FUNCTION. This table will contain which role get which page. One page may be assigned to multiple role_id.

4.  Now you have to create a table named EM_MENUMAS with the column of SLNO,NM,PARENTNM,NODETYPE & PAGE_NAME. Here, SLNO is just row number, NM is menu item name which will be shown at pages, PARENTNM is the NM under which this sub-menu is used. if this item is not under any item, then, this column will be blank. NODETYPE will M or L. if it is leaf item or sub menu, then use L other which use M. PAGE_NAME is page link for this menu item. This will be exactly same with ROLE_FUNCTION of ROLE_DETAILS table.

5. Create a table USERROLES with column of USERID & ROLEID. Here we map roles to users.

6. Create a stored function named TREE_MENU. Code of the function is :

CREATE OR REPLACE function DBBL.tree_menu ( v_user_id in varchar2 )
return varchar2 is
v_ret   varchar2(5000) := ”;
t_ret   varchar2(5000);
type t_rec is record (lvl number, slno number, nm varchar2(50), nodetype varchar2(10));
type t_tab is table of t_rec index by binary_integer;
v_tab   t_tab;
pos     integer := 1;
begin
/*for i in (select level lvl, slno, nm, lpad(‘ ‘, level * 14, ‘ ‘) || nm menu,  parentnm,nodetype, page_name from em_menumas
start with parentnm is null
connect by prior nm = parentnm
order siblings by slno)*/
for i in (select level lvl, slno, nm, lpad(‘ ‘, level * 14, ‘ ‘) || nm menu,  parentnm,nodetype, page_name from em_menumas
where (page_name in ( select role_function from  role_detail
where role_id  in ( select roleid from userroles where userid= v_user_id  )
) and  nodetype=’L’) or nodetype=’M’ and (parentnm in (select roleid from USERROLES where userid=v_user_id)
or parentnm in (select ‘Remittance’ from dual) or parentnm is null )

and nm not in (select ROLE_ID from ROLE_MASTER where role_id not in  (select roleid from USERROLES where userid=v_user_id))
start with parentnm is null
connect by prior nm = parentnm
order  by slno)
loop
if i.nodetype = ‘M’ then

if pos> 1 then
for k in reverse 1 .. v_tab.count
loop
if v_tab(k).lvl = i.lvl then
t_ret := t_ret || ‘</ul></li>’;
goto lbl;
end if;
end loop;
end if;

<<lbl>>

v_tab(pos).lvl          := i.lvl;
v_tab(pos).slno         := i.slno;
v_tab(pos).nm           := i.nm;
v_tab(pos).nodetype     := i.nodetype;

t_ret := t_ret || ‘<li>’ || i.nm || ‘<ul>’;
pos := pos + 1;

else
–t_ret := t_ret || ‘<li>’ || case when i.PAGE_NAME is not null then ‘<a onclick=”getPage(“‘ || i.PAGE_NAME || ‘”)”>’ else ” end ||  ” || i.nm || ‘</li>’;
— t_ret := t_ret || ‘<li>’ || case when i.PAGE_NAME is not null then ‘<a onclick=”getPage(”’ || i.PAGE_NAME || ”’)”>’ ||  i.nm || ‘</a></li>’ else  i.nm || ‘</li>’ end;
if i.PAGE_NAME=’ViewProjectDetails.jsp’ then
t_ret := t_ret || ‘<li>’ || case when i.PAGE_NAME is not null then ‘<a onclick=”getPage(”’ || i.PAGE_NAME || ‘?prjID=’ || v_user_id || ”’)”>’ ||  i.nm || ‘</a></li>’ else  i.nm || ‘</li>’ end;
else
t_ret := t_ret || ‘<li>’ || case when i.PAGE_NAME is not null then ‘<a onclick=”getPage(”’ || i.PAGE_NAME || ”’)”>’ ||  i.nm || ‘</a></li>’ else  i.nm || ‘</li>’ end;
end if;
end if;
end loop;
for k in 1 .. v_tab(v_tab.count).lvl
loop
t_ret := t_ret || ‘</ul></li>’;
end loop;
v_ret := t_ret  ;
return (v_ret);
end;
/

7. Create a method in JAVA data access layer to call the stored function like this:
public String menuString(String logedInUser)
{
String menu = “”, ret;

Statement stmt = null;
conn = DBConnect.getConnection();
CallableStatement cal_stmt = null;

if(conn != null)
{
try{
stmt = conn.createStatement();

cal_stmt = conn.prepareCall(“{? = call tree_menu(?)}”);

cal_stmt.registerOutParameter(1, Types.VARCHAR);

cal_stmt.setString(2, logedInUser);

cal_stmt.execute();

ret = cal_stmt.getString(1);

menu = “<ul  id=\”treemenu1\” class=\”treeview\”>” + ret + “</ul>”;
menu += “<script type=\”text/javascript\”>” +
“ddtreemenu.createTree(\”treemenu1\”, true) ” +
“</script>”;

}
catch(Exception e)
{
menu = e.getMessage();
}
finally
{
try {
conn.close();
} catch (SQLException e) {
// TODO Auto-generated catch block
e.printStackTrace();
}
}
}

return menu;

}


8.  Take a JSP page like this:

<%
response.setHeader(“Cache-Control”,”no-cache”);
response.setHeader(“Pragma”,”no-cache”);
response.setDateHeader (“Expires”, -1);

%>
<%@ page session=”true” language=”java” contentType=”text/html; charset=ISO-8859-1″
pageEncoding=”ISO-8859-1″
%>
<%@ page language=”java” import=”java.util.*” %>
<%@ page import=”dal.*” %>
<%@page import=”dal.dao.*”%>
<%@ page import=”dal.servlet.*” %>

<!DOCTYPE html PUBLIC “-//W3C//DTD HTML 4.01 Transitional//EN” “http://www.w3.org/TR/html4/loose.dtd”&gt;

<%@page import=”dal.HelperCls”%><html>
<head>
<meta http-equiv=”Content-Type” content=”text/html; charset=ISO-8859-1″>
<title>Wellcome  ! </title>
<script type=”text/javascript” src=”simpletreemenu.js”>
</script>
<script type=”text/javascript” src=”call.js”>
</script>
<link rel=”stylesheet” type=”text/css” href=”../css/style.css”>
<link rel=”stylesheet” type=”text/css” href=”simpletree.css” />
<style type=”text/css”>
div.scroll
{

width:80%;
height:780px;
overflow:scroll;
}

p.one
{
width: 300px; height: 100%;
border-style: solid;
border-width: 1px;
border-color: fuchsia;
border-spacing: 2px;
}

</style>
<script type=”text/javascript”>

function logout()
{
document.location.href = “index.jsp”;
}
</script>

</head>
<body >

<table Border=”0″ cellpadding=”0″ cellspacing=”0″ width=”100%” “>
<tr>
<td width=”100%” align=”center”>
<a href=”<%=basePath%>”><div id=”logo”></div></a>
</td>
</tr>
<tr>
<td align=”right”>
<font color=”red”><b>Status :<i><%=dayStatus %>,&nbsp;&nbsp; </i>  </b></font>
<font color=”red”><b>Server Date :<i><%=serverCurrentDt %></i>  </b></font>
</td>
</tr>

<tr><td><hr style=”height: 5px; color: green” /></td></tr>
<tr>
<td>
<table  Border=”0″ cellpadding=”2″ width=”100%” >

<tr>
<td width=”20%” valign=”top” >

<div>
<%

%>
<%= new HelperCls().menuString(loginID) %>
<p align=”center”>
<input type=”image” src=”logout.jpg” alt=”Log Out”  onclick=”logout()”/>
<br>
</p>
</div>

<!–  <table  width=”80%” border=”1″ align=”left” cellspacing=”2″ cellpadding=”2″>
<tr>
<td colspan=”2″ align=”center”>
<font size=”5″ face=”arial” color=”green”>
<b>Login Branch Code</b></font>
</td>
</tr>
<tr>
<td>
Login User :
</td>
<td >
–>
<font size=”3″ face=”arial”  color=”green”>
<!– login name  –>
</font>
<!–
</td>
</tr>
<tr>
<td>
Login Role :
</td>
<td >
<font size=”3″ face=”arial”  color=”green”> –>
<!– </font>
</td>
</tr>
<tr>
<td>
Login ID :
</td>
<td >
<font size=”3″ face=”arial”  color=”green”> –>
<!– </font>
</td>
</tr>
</table>  –>

</td>
<td id=”innerContent” width=”100%” valign=”top”>

</td>
</tr>
<tr>
<td colspan=”2″ align=”center”>
<div id=”slice-66″>
© DBBL,2010. All right reserved by Dutch-Bangla Bank Limited.
<br>
Website developed by IT Division | http://www.dutchbanglabank.com </div>
</td>
</tr>
</table>
</td>
</tr>
</table>
</body>
</html>


Here, this page will be used as master page and all other pages will be loaded as inner page.


9. We have to use following CSS and Javascript pages:

a) simpletree.css:

.treeview ul{ /*CSS for Simple Tree Menu*/
margin: 0;
padding: 0;
text-align: left;
white-space: nowrap;
margin: 0px 0px 0px 0px;
padding: 0px;
}

.treeview li{ /*Style for LI elements in general (excludes an LI that contains sub lists)*/
list-style-type: none;
padding-left: 22px;
margin-bottom: 3px;
}

.treeview li.submenu{ /* Style for LI that contains sub lists (other ULs). */
background-color:#D6E7F1;
cursor: hand !important;
cursor: pointer !important;
list-style-image: none;
list-style-type: none;
white-space: nowrap;
margin:0px;
padding: 5px 0px 7px 8px;
width:179px;
font-weight: bold;
border-bottom:1px solid #a1a3a5;
border-left:1px solid #a1a3a5;
border-right:1px solid #a1a3a5;
}

.treeview li.submenu ul{ /*Style for ULs that are children of LIs (submenu) */
display: none; /*Hide them by default. Don’t delete. */
cursor: hand !important;
cursor: pointer !important;
}

.treeview .submenu ul li{ /*Style for LIs of ULs that are children of LIs (submenu) */
cursor: default;
cursor: hand !important;
cursor: pointer !important;
}

/******************** Sub Menu ****************/

.treeview.ul.submenu {
text-align: left;
white-space: nowrap;
margin: 0px 0px 0px 0px;
padding: 5px;
}

.treeview.ul.submenu li {
list-style-image: none;
list-style-type: none;
white-space: nowrap;
margin:0px;
padding: 5px 0px 7px 8px;
width:179px;
font-weight: bold;
border-top:1px solid #a1a3a5;
}

.treeview.ul.submenu li.selected a{color:#0E2199;}

.treeview.ul.submenu li.selected {
border: 1px solid #a3a4a6;
background-color: #ffffff;

}

.treeview.ul.submenu li a {
display: block;
width: 100%;
color: #444;
font-weight: bold;
font-size:13px;
text-decoration: none;
}

.treeview.ul.submenu li a:hover {
text-decoration:none;
color:#0E2199;
}


b) simpletreemenu.js:

var persisteduls=new Object()
var ddtreemenu=new Object()

ddtreemenu.closefolder=”” //set image path to “closed” folder image
ddtreemenu.openfolder=”” //set image path to “open” folder image

//////////No need to edit beyond here///////////////////////////

ddtreemenu.createTree=function(treeid, enablepersist, persistdays){
var ultags=document.getElementById(treeid).getElementsByTagName(“ul”)
if (typeof persisteduls[treeid]==”undefined”)
persisteduls[treeid]=(enablepersist==true && ddtreemenu.getCookie(treeid)!=””)? ddtreemenu.getCookie(treeid).split(“,”) : “”
for (var i=0; i<ultags.length; i++)
ddtreemenu.buildSubTree(treeid, ultags[i], i)
if (enablepersist==true){ //if enable persist feature
var durationdays=(typeof persistdays==”undefined”)? 1 : parseInt(persistdays)
ddtreemenu.dotask(window, function(){ddtreemenu.rememberstate(treeid, durationdays)}, “unload”) //save opened UL indexes on body unload
}
}

ddtreemenu.buildSubTree=function(treeid, ulelement, index){
ulelement.parentNode.className=”submenu”
if (typeof persisteduls[treeid]==”object”){ //if cookie exists (persisteduls[treeid] is an array versus “” string)
if (ddtreemenu.searcharray(persisteduls[treeid], index)){
ulelement.setAttribute(“rel”, “open”)
ulelement.style.display=”block”
ulelement.parentNode.style.backgroundImage=”url(“+ddtreemenu.openfolder+”)”
}
else
ulelement.setAttribute(“rel”, “closed”)
} //end cookie persist code
else if (ulelement.getAttribute(“rel”)==null || ulelement.getAttribute(“rel”)==false) //if no cookie and UL has NO rel attribute explicted added by user
ulelement.setAttribute(“rel”, “closed”)
else if (ulelement.getAttribute(“rel”)==”open”) //else if no cookie and this UL has an explicit rel value of “open”
ddtreemenu.expandSubTree(treeid, ulelement) //expand this UL plus all parent ULs (so the most inner UL is revealed!)
ulelement.parentNode.onclick=function(e){
var submenu=this.getElementsByTagName(“ul”)[0]
if (submenu.getAttribute(“rel”)==”closed”){
submenu.style.display=”block”
submenu.setAttribute(“rel”, “open”)
ulelement.parentNode.style.backgroundImage=”url(“+ddtreemenu.openfolder+”)”
}
else if (submenu.getAttribute(“rel”)==”open”){
submenu.style.display=”none”
submenu.setAttribute(“rel”, “closed”)
ulelement.parentNode.style.backgroundImage=”url(“+ddtreemenu.closefolder+”)”
}
ddtreemenu.preventpropagate(e)
}
ulelement.onclick=function(e){
ddtreemenu.preventpropagate(e)
}
}

ddtreemenu.expandSubTree=function(treeid, ulelement){ //expand a UL element and any of its parent ULs
var rootnode=document.getElementById(treeid)
var currentnode=ulelement
currentnode.style.display=”block”
currentnode.parentNode.style.backgroundImage=”url(“+ddtreemenu.openfolder+”)”
while (currentnode!=rootnode){
if (currentnode.tagName==”UL”){ //if parent node is a UL, expand it too
currentnode.style.display=”block”
currentnode.setAttribute(“rel”, “open”) //indicate it’s open
currentnode.parentNode.style.backgroundImage=”url(“+ddtreemenu.openfolder+”)”
}
currentnode=currentnode.parentNode
}
}

ddtreemenu.flatten=function(treeid, action){ //expand or contract all UL elements
var ultags=document.getElementById(treeid).getElementsByTagName(“ul”)
for (var i=0; i<ultags.length; i++){
ultags[i].style.display=(action==”expand”)? “block” : “none”
var relvalue=(action==”expand”)? “open” : “closed”
ultags[i].setAttribute(“rel”, relvalue)
ultags[i].parentNode.style.backgroundImage=(action==”expand”)? “url(“+ddtreemenu.openfolder+”)” : “url(“+ddtreemenu.closefolder+”)”
}
}

ddtreemenu.rememberstate=function(treeid, durationdays){ //store index of opened ULs relative to other ULs in Tree into cookie
var ultags=document.getElementById(treeid).getElementsByTagName(“ul”)
var openuls=new Array()
for (var i=0; i<ultags.length; i++){
if (ultags[i].getAttribute(“rel”)==”open”)
openuls[openuls.length]=i //save the index of the opened UL (relative to the entire list of ULs) as an array element
}
if (openuls.length==0) //if there are no opened ULs to save/persist
openuls[0]=”none open” //set array value to string to simply indicate all ULs should persist with state being closed
ddtreemenu.setCookie(treeid, openuls.join(“,”), durationdays) //populate cookie with value treeid=1,2,3 etc (where 1,2… are the indexes of the opened ULs)
}

////A few utility functions below//////////////////////

ddtreemenu.getCookie=function(Name){ //get cookie value
var re=new RegExp(Name+”=[^;]+”, “i”); //construct RE to search for target name/value pair
if (document.cookie.match(re)) //if cookie found
return document.cookie.match(re)[0].split(“=”)[1] //return its value
return “”
}

ddtreemenu.setCookie=function(name, value, days){ //set cookei value
var expireDate = new Date()
//set “expstring” to either future or past date, to set or delete cookie, respectively
var expstring=expireDate.setDate(expireDate.getDate()+parseInt(days))
document.cookie = name+”=”+value+”; expires=”+expireDate.toGMTString()+”; path=/”;
}

ddtreemenu.searcharray=function(thearray, value){ //searches an array for the entered value. If found, delete value from array
var isfound=false
for (var i=0; i<thearray.length; i++){
if (thearray[i]==value){
isfound=true
thearray.shift() //delete this element from array for efficiency sake
break
}
}
return isfound
}

ddtreemenu.preventpropagate=function(e){ //prevent action from bubbling upwards
if (typeof e!=”undefined”)
e.stopPropagation()
else
event.cancelBubble=true
}

ddtreemenu.dotask=function(target, functionref, tasktype){ //assign a function to execute to an event handler (ie: onunload)
var tasktype=(window.addEventListener)? tasktype : “on”+tasktype
if (target.addEventListener)
target.addEventListener(tasktype, functionref, false)
else if (target.attachEvent)
target.attachEvent(tasktype, functionref)
}


Enjoy your database driven menu.


Picking up rate for all dates from few day’s rate

May 18, 2011

I want to discuss an important query just now. I have done today it. Suppose, I have a rate_info table like this

dt rate
01/01/2011 24.50
5/01/2011 23.45
15/01/2011 20.34
25/01/2011 28.22
10/02/2011 15.25

Now I have to calculate rate for all dates. The rate will be same until the rate has been changed. Then the query will be like this:

select a.*,(select rate from rate_info where dt=(select max(dt) from rate_info where dt <=a.dt_new))rate_new from
(select to_char((select min(dt) from rate_info)+(level – 1),’DD-MON-RRRR’)dt_new from dual
    connect by level <= ((select max(dt) from rate_info) – (select min(dt) from rate_info)+1))a

If  a single day contain multiple rate with different version like this:

dt rate Version
01/01/2011 24.50 1
5/01/2011 23.45 1
15/01/2011 20.34 1
25/01/2011 28.22 1
10/02/2011 15.25 1
10/02/2011 13.24 2

Then the rate with maximum version will be picked up and query will be like this:
select a.*,(select rate from rate_info where dt=(select max(dt) from rate_info where dt <=a.dt_new)
and version =(select max(version) from rate_info where dt=(select max(dt) from rate_info where dt<=a.dt_new )
))rate_new from
(select to_char((select min(dt) from rate_info)+(level – 1),’DD-MON-RRRR’)dt_new from dual
connect by level <= ((select max(dt) from rate_info) – (select min(dt) from rate_info)+1))a


Filling blank field with previous row value in PL/SQL

May 14, 2011

Suppose I have Table named emp like this

empno comm
033001 RUET
033002
033003
033004 KUET
033004
033005 CUET

Now I want to fill the blank cells with the previous value. Such as comm of 033002, 033003  will be RUET. comm of 033004 will be KUET. How can I do this? I had googled and found an interesting query.

1. I have to execute following query:

select empno,comm, lag(comm ignore nulls) over (order by empno)prev_comm from emp order by empno.

Then I get a view like this :

empno comm prev_comm
033001 RUET
033002 RUET
033003 RUET
033004 KUET RUET
033004 KUET
033005 CUET KUET
CUET

2. Suppose the previous view is represented by mm.
Then I have to write the following query on mm view.

select empno, case when comm is null then prev_comm else comm end as comm from mm.

Then we will get the desired view :

empno comm
033001 RUET
033002 RUET
033003 RUET
033004 KUET
033004 KUET
033005 CUET

So, the final query will be:

select empno, case when comm is null then prev_comm else comm end as comm from (select empno,comm, lag(comm ignore nulls) over (order by empno)prev_comm from emp order by empno)